Here’s How One Can Save GIFs From Twitter on Android and iPhone

Sharing emojis, animojis, and GIFs on various social networking platforms can be pretty fun and interesting. In fact, nowadays, more and more people share emojis in their text messages and posts. Emojis makes our conversations more lively and expressive. And all of the social media apps allow their users to share emojis within their texts and posts. And not only emojis or animojis, but sending GIFs on any social media platform is also pretty easy. But have you ever wanted to save any GIF to your device from any social networking platform? Suppose someone shared a GIF on any social media app, and you liked it so much that you wish you could save it on your device. Do you know how you can save any GIF from any social networking app to your device? Well, if you want to save a GIF from your Twitter account to your device and you don’t know how to do so, then you have come to the right place.

Here’s How One Can Save GIFs From Twitter on Android and iPhone

In the following article, you will get to know how you can save a GIF to your device from your Twitter account. Here, we are going to provide you with a proper procedure for performing this task. So, please go through the following post to see the method.

The Techniques for Saving GIFs from Twitter on Android and iPhone

Any Twitter user can easily save GIFs from their account on their Android device and iPhone. And the procedure for performing this task varies according to the device that you own. Let’s see how you can save GIFs from Twitter to your Android device.

The Steps for Saving GIFs from Twitter on Android Devices

The Steps for Saving GIFs from Twitter on Android Devices

Here are the steps that the Android device users will have to follow to save GIFs from their Twitter account on their device:

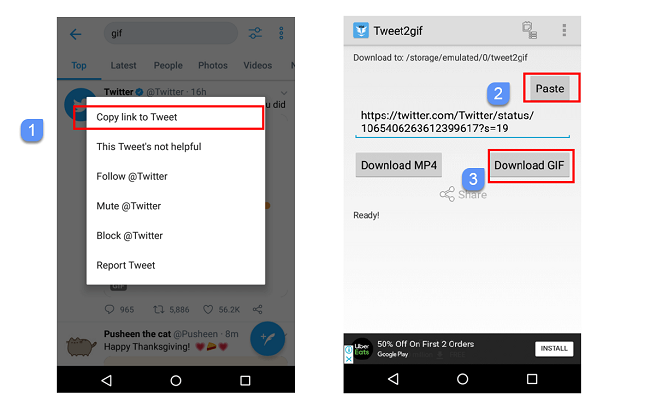
  • First of all, open the Play Store app on your device and then search for the “Download Twitter Videos” app. And when you find the app, install it on your device.
  • And now, launch the Twitter app and go to the tweet containing the GIF that you would like to save on your device.
  • And then, go to the share icon given on the bottom right corner of your screen and then choose the “Downloader for Twitter” option. After this, the GIF will start downloading on your device and will be saved to the Photos app.

The Steps for Saving GIFs from Twitter on iPhone

The Steps for Saving GIFs from Twitter on iPhone

Follow the steps to save the GIFs from Twitter on iPhone:

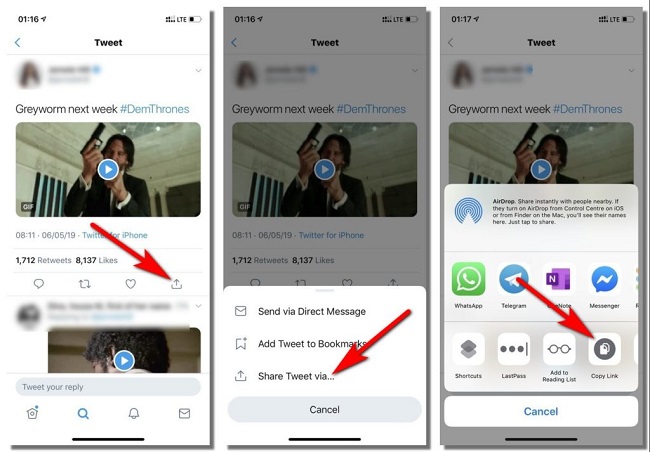
  • To save the GIFs from Twitter on your iPhone, firstly, install the shortcut “DTwitter” by visiting RoutineHub.
  • And after installing the shortcut, head over to the Twitter app on your iPhone and then go to the GIF that you want to save on your device.
  • And now, open the share sheet by tapping on the GIF.
  • After this, from the options that appear on your screen, tap on “DTwitter.”
  • And now, the shortcut will run on your device, and the GIF will be saved to the Photos app.

So, these are the techniques through which any Android device and iPhone user can easily save GIFs from Twitter to their device. Follow these steps now, and please keep visiting our website.

Edward Lewis is a creative person who has been writing blogs and articles about cybersecurity. He writes about the latest updates regarding mcafee.com/activate and how it can improve the work experience of users. His articles have been published in many popular e-magazines, blogs, and websites.

Source : https://mcafeeactivate.uk.net/heres-how-one-can-save-gifs-from-twitter-on-android-and-iphone/

Everything You Need to Know About the Govee Lyra Corner Floor Lamp

The Govee Lyra is an outstanding accent light (freestanding) for any corner of your home. This corner floor lamp is capable of fantastic dynamic multi-color projections that’ll be sufficient to amaze the guests. Albeit, voice control is confined but the app could do better with a few streamlining. But if you only want some flashy lights, Govee Lyra RGBIC LED strips could provide you a good value for money with the same features. 

Price and Availability

The Govee Lyra lamp has been launched and available to purchase from June 20, 2021. You can get them on Amazon as well as on the official Govee’s website. You can get the Govee Lyra lamp on Amazon for the launch price of USD 149.99. Whereas it is available for a sale price of $139.99 on Govee’s storefront. The Govee Lyra does need some assembling before utilizing. However, you’ll find everything inside the box that you have to put together.

Lyra Specifications

  • Brand Name:  Govee
  • Protocol:  Wi-Fi, Bluetooth
  • Integrations:  Alexa, Google Home
  • Hub Required:  No
  • Multi-color Capable:  Yes
  • Music Reactive:  Yes

The Hardware of Govee Lyra

The Lyra corner lamp comes in a compact box, which means you have to set up the lamp first. You will get the following things inside the box:

  1. Three aluminum profile segments
  2. Bulky base with linked control box
  3. LED strips in Silicone case
  4. Screws and connecting brackets
  5. Remote-control holder
  6. Power cord
  7. RF remote control

Once you are done with assembling the lamp, you’re all set to use it. However, you are required to follow the instructions carefully. Once you construct the main tower, you need to plug in the LED strip and carefully pull it into the profiling.

What have I found in the box?

When I got the box containing the Govee Lyra corner floor lamp, I was very excited about the possibilities for what I could do with it. But when I opened it, I had to assemble it first. The major part of the lamp is made up of three parts such as the base, the frame, and the light strip. Its frame was made from an appealing matte silver aluminum alloy that comes in three sections. All the three sections slide together, and they are held together with the added screws. You will also find a screwdriver inside the box.

Once I have done with the assembly part that is attaching the frame to the weighted cylindrical base with the help of some screws. Once the base and frame get assembled completely, you have to get the lights ready to be lit. You will find the RGBICWW LED strip inside a frosted silicone case that presses into the frame. Then, at the bottom, you will find the connector that connects the lights to the base for supplying power and controls. However, I had a few difficulties getting the RGBICWW LED strip attached. But once it’s all done, it was time to light it up.

After that, I searched for a perfect location for Lyra, then placed it in the corner of my home for the light to be reflected against. After that, I put it on with the included remote. It’s a comparatively simple remote that provides you a lot of functionality. It works on the RF concept, so you don’t need to think about the line of sight for the lamp to respond. Also, you can adjust brightness, colors, turn on Music Mode, and power. You will also find a magnetic holder mounted onto the lamp to attach the RF remote.

What needs to be improved?

The Lyra corner floor lamp performs a stunning job of illuminating a space. And you know what, it even seems nice when it’s turned off. From a working standpoint, I just can’t complain about it at all. The problems I have found in the lamp aren’t associated with its functionality but with a few of its physical appearance. I just have some issues with the Lyra corner floor lamp, like with its power cable and the assembly process.

However, I like the materials used and the color options Govee gave to Lyra. When powered off, it matches wonderfully with almost every space. And noticeably, the Lyra corner floor lamp is sleek and modern in appearance. But, finding a perfect place to put the Lyra lamp is even a more difficult task because of its short power cable.

If your home has a lot of power sockets and probably a variety of options for plugging in your lamp, then there is no issue. But if your home doesn’t include so many power outlets, then to put the Lyra lamp right there in your favorite place, you may need an extension cable. And trust me, this can help you out to solve the problem of plugging in the lamp in your favorite place.

Edward Lewis  is a Microsoft Office expert and has been working in the technical industry since 2002. As a technical expert, Edward has written technical blogs, manuals, white papers, and reviews for many websites such as office.com/setup.

Source : https://ms1office.com/everything-you-need-to-know-about-the-govee-lyra-corner-floor-lamp/

Windows 10 Expiry Date Is Out, What to Expect From Windows 11

Microsoft made quite bold claims about Windows 10 and released it as a service instead of an operating system. Since then, Windows 10 was considered the last version of Windows. Now 2021 is underway, technology is moving fast, and things are different now. Microsoft has listed an expiry date for Windows 10 ahead of the June 24 launch event.

Microsoft is holding the Windows 11 event on June 24, and Microsoft has also released an 11-minute video on YouTube about it. The video has a collection of startup sounds of different Windows versions, which is quite slow. When you speed up the video, you can hear a new startup sound that you might hear on Windows 11. The company has just updated its official documents stating the EOL date for Windows 10.

Windows 10 end date declared

All Windows 10 operating system versions will be supported with security updates until October 14, 2025. i.e., people have enough time of 2 years to upgrade to Windows 11. The date of October 14, 2025, applies to all versions of Windows 10, including Windows 10 Home, Windows 10 Pro, Windows 10 Pro Education, and Windows 10 Pro for Workstation.

On June 24, Microsoft will land on the platform to announce what the “Sun Valley” update for Windows is expected to be. Rumors have so far pointed to a massive visual with better connectivity features for the latest device for Windows.

The operating system has completed 6 years since Windows 10 was introduced in 2015. Obviously, working on Window 10 and its performance has been quite spectacular. Earlier, Windows XP and Windows 7 were considered successful OS.

Expectations from Windows 11

With Windows 11, it is expected that Microsoft will bring most of the content of Windows 10 from the last few builds. In addition to new icons and themes, the new Windows can bring easy control and a smart action center with mobile devices.

It remains to be seen whether Microsoft releases it as a free software update for licensed Windows 10 users. The company also launched Windows 10 as a free software update.

One feature which might appear in Windows 11 is a floating Start Menu. Another example is the Taskbar’s floating jump lists. A whole other feature is rounded corners and menus, as well as a revamped Action Center with “sliders.” Some of these can be seen in the gallery above.

Aside from the visual redesign, there are a number of other features that could be included in Windows 11. The first one is a redesigned Microsoft Store, which gives creators more money and allows classic Win32 apps like Google Chrome to run.

A remodeled settings app, which was recently leaked by a French publication, is another thing.

The Settings app will now include battery usage information.  This type of feature has been available on smartphones for a long time, but it has been notably missing from Windows.

Other features widely speculated to be moving from ‘Sun Valley’ to Windows 11 also include the ability to remove most of the pre-installed Microsoft apps, improvements to snap assist for external displays, and a taskbar-based dashboard for your Microsoft Account.

In addition, recent test builds suggest that the taskbar and the File Explorer process, which is usually found in Task Manager, have finally been separated.

Predictions for Windows 11 tablet

As of Windows 8, tablet mode is one of the operating system’s weak points.

The most important widely expected feature is a new ‘gesture layer’ that would sit just above the user interface and enable trackpad-like gestures on a touchscreen.

Both pen and audio inputs are predicted to be refined further, with a new UI for audio and a context menu for pen both scheduled.

These tablet features could serve as a showcase for Windows 11, especially with Microsoft’s upcoming Surface products. The fact that its forthcoming tablets will have a new numbered operating system might be a major selling point for fresh users in the future.

Davis Johnson is a Microsoft Office expert and has been working in the technical industry since 2002. As a technical expert, Davis has written technical blogs, manuals, white papers, and reviews for many websites such as office.com/setup.

Source : https://go-officecom.com/windows-10-expiry-date-is-out-what-to-expect-from-windows-11/

Smartphones You Might Not Want to Miss This Year

Buying a smartphone means that should last a few years and you won’t have to spend extra money on its repairing cost or anything else’s. Smartphones have become quite costlier compared to the last few years but they also offer great and more advanced features than the previous flagships. We have many decent options to buy from iPhone 12 to Samsung Galaxy S21 Ultra, these smartphones can be bought for $800 and $1000 respectively.

An ideal smartphone will offer you a great camera quality, a long-lasting battery, a nice display, a great build quality, fast charging support, a decent refresh rate (90Hz or more), quite fast, 5G support, social networking, decent storage capacity (128GB or more), and a nice design. You might be thinking whether it’s possible to get all these features in a smartphone or not, believe me, you can get a phone packed with all those things. In fact, it has become quite easier to get all those stuff on a phone than ever before. So, if your preference is to pick the best flagship, you may not want to miss the below-mentioned devices.

Apple iPhone 12

Apple iPhone 12 is packed with a 6.10-inch high-resolution display, a 12MP front camera, two 12MP+12MP back cameras, OS iOS 14, and a range of storage options, including 64GB, 128GB, and 256GB. The flagship is being sold in multiple colors, including black, white, blue, red, and green. Apple iPhone 12 Mini and 12 Pro Max are also two of the nicest options for consideration.

Samsung Galaxy S21 Ultra

Samsung Galaxy S21 Ultra is the latest launch of the company. The flagship is packed with a 6.8-inch 3200 × 1440 OLED display, Exynos 2100 CPU, a 40MP front camera, and four back cameras of 108MP + 12MP + 10MP and 10MP. The flagship offers a 500mAh battery, 12GB of RAM, 128GB of storage, and OS Android 11.

Samsung Galaxy Note 20 Ultra

Samsung Galaxy Note 20 Ultra comes with a huge 4500mAh battery, an enormous 6.9-inch display, a 120Hz refresh rate, a triple rear camera setup, and Qualcomm Snapdragon 865 Plus processor. It offers support for Samsung’s S Pen for stylus input that will help you write or create doodles on the screen without using if your fingers. You will be astonished to see the way this flagship performs. The company has priced this flagship at $1300.

Google Pixel 4A 5G

Google’s Pixel 4A 5G allows you to access multiple features. The flagship has a 6.2-inch high-resolution display, an outstanding camera quality, clean and uncluttered Android software, and 5G network support. It features a Snapdragon 765G CPU, an 8MP front camera, two 12.2MP + 16MP rear cameras, 6GB of RAM, 128GB of storage, and a 3885mAh battery. Android 11 runs this flagship. You can get almost everything the Pixel 4A 5G offers you on other flagships with the same price range except the camera quality. None flagships offer you as great camera quality as Google Pixel 4A 5G offers you in this price range. It starts at $499.

Samsung Galaxy S20 FE 5G

For the ones who are looking for a budget-friendly flagship with high-end performance, Samsung Galaxy S20 FE 5G might be the right choice for them. The smartphone is packed with a 6.5-inch Super AMOLED display, a 4500mAh battery, a 32MP selfie camera, a 120Hz refresh rate, a triple camera setup at the back with two 12MP sensors, and an 8MP sensor. The flagship offers you multiple options in terms of storage and RAM capacity. You can get either 6GB or 8GB of RAM and 128 or 256GB of storage. Android 10 runs this flagship and a 7nm based Qualcomm’s Snapdragon 865 CPU process it smoothly.

I’m Edward Lewis. I’m an art director living in 737 Northcrest Shopping Center, Fort Wayne, IN 46805, United States. I am a fan of photography, technology, and design. mcafee.com/activate, I’m also Online Marketing Expert with 3 years of extensive and rich experience of Marketing through Social Networking Platforms.

Source : https://johnnypotterblog.wixsite.com/mysite/post/smartphones-you-might-not-want-to-miss-this-year

USB Wi-Fi Adapter is Not Connecting to the Internet? Here Are The Fixes

With the help of USB Wi-Fi adapters, you can override the need of the computer’s inbuilt wireless functionality. This, in turn, provides you with a faster, more reliable connection to your available network. It cuts out the requirement for running cords or installing internal hardware, and you can connect multiple devices to it. However, at times, the wireless USB adapter may no longer power down or have trouble staying connected to the network. If your adapter is not connecting to the internet, then check out the solutions mentioned below.

Roll Back to the Network Adapter Driver

You should pursue these directions provided below:

  1. Go to the Windows icon and right-click on it, then choose the Device Manager.
  2. You should choose the Network adapters, and click to extend the list.
  3. Select the name of the network adapter.
  4. Navigate to the network adapter, and right-click on it, then choose the Properties option.
  5. Once you reach the Properties, choose the tab of Driver.
  6. Now, click on the Roll Back Driver option and pursue the on-screen prompts.

Check the Wi-Fi Connection

You should pursue these directions provided below:

  1. Open the Start menu and choose the Settings option.
  2. After that, click on the Network and Internet option.
  3. You should click on Wi-F to look for applicable networks.
  4. Select your network.
  5. Now, select the Connect option.

Disable Airplane Mode 

You should pursue these directions provided below:

  1. Firstly, don’t forget to turn on the Wi-Fi and then launch the settings of ‘Network and Internet.’
  2. Then click on the ‘Airplane mode’ option.
  3. Now, disable it.

Launch the Network Troubleshooter

You should pursue these directions provided below:

  1. Reach the Windows icon, and right-click on it, then choose the Control Panel option.
  2. Thereafter, click on the ‘Network and Internet’ option.
  3. You should choose the ‘Network and Sharing center’ option.
  4. Navigate to the Search section and input ‘Identify and repair network problems’ into it and select the OK button.

Make the System Discoverable Again

You should pursue these directions provided below:

  1. Select the ‘Network and Internet’ option from the Settings.
  2. Then choose the Wi-Fi option.
  3. Once you reach the W-Fi window, choose the ‘Manage known networks’ option.
  4. Pick the network connection you would like to change.
  5. Go to the Properties option.
  6. Beneath the ‘Network Profile’ section, click on the Private option.

If your USB wi-fi adapter is not connecting to the internet network, then try the troubleshooting tips mentioned above.

Edward Lewis is a creative person who has been writing blogs and articles about cybersecurity. He writes about the latest updates regarding mcafee.com/activate and how it can improve the work experience of users. His articles have been published in many popular e-magazines, blogs, and websites.

Source : Internet

Create a Loomie 3D Avatar for Your Zoom Meetings with these Steps

Want to appear in a 3D Avatar in your Zoom meetings? Follow this article to the end. Give your mates something fun by creating an avatar of yourself for Zoom via LoomieLive. You can also switch back and forth between your customized avatar and your real facial identity on camera. Your avatar will also change your voice during your calls. With this article’s help, you would learn how to use Loomie and Loomis Live while you are on a conference call through Zoom. None of your real-life movements will get reflected on the camera because your Loomie will take over your complete video feed.

How to Make an Avatar for Zoom Calls?

You need to create an avatar from your handset and install the desktop version of the software for using it with Zoom or any other supported program. If you don’t want to customize your avatar, you can skip that process. The directions covered here are for LoomieLive for Windows as well as the macOS program. The Loomie application is, however, available only for Android and iOS.

  1. Install the Loomie app on your Android or iOS device.
  2. Click on the camera button and take a picture of yourself. To get the best shot, make sure you follow the on-screen guide.
  3. You need to pick up a Loomie variation from the various options given there. You can also swap between genders from the buttons given at the bottom.
  4. Then click on the Sign In button so as to create an account and to save your avatar.
  5. If you want to make any customization, do it and then click on save after you have finished customizing

Use Your Loomie Avatar in Zoom with these Steps

You can use your Loomie Avatar in Zoom with the help of these steps:

  1. Download and then install LoomieLive on your system.
  2. You need to open up the program and select Login from the Menu gear icon on the top right corner.
  3. Fill up your account details.
  4. You can then change the camera settings before you start or click on the Zoom call to switch the camera settings while you are on the call.
  5. If you want to switch your avatar camera during the call, you need to press on the arrow appearing next to Stop Video. Otherwise, you can click on the settings button on the top right corner of Zoom and press on the Video tab on the left side. You can choose the Loomie option from the menu appearing next to the Camera. After that, all the calls that you will make through Zoom will be using your Loomie avatar instead of your real identity.

Conclusion

With the help of the steps, as mentioned above, you can create a 3D avatar for your Zoom meetings. Do remember that you can always switch back to the normal webcam whenever desired, from the same menu. You need to switch over to LoomieLive by using the buttons on to the right in case you want to send the animations through Zoom. You can also make a virtual background if you want to keep other things in your room private.

Edward Lewis  is a Microsoft Office expert and has been working in the technical industry since 2002. As a technical expert, Edward has written technical blogs, manuals, white papers, and reviews for many websites such as office.com/setup.

Source : Loomie 3D Avatar

The Best Free Stock Video Sites in 2020

Whether you are planning to create an advertisement video for your brand promotion or an educational video for your YouTube channel, you may need some videos that may help viewers understand the ideas better. Finding a proper video according to the scenario is not easy. Sometimes, one may have to spend a couple of hours searching for a proper video that describes the situation in a perfect way.

Finding royalty-free videos for your project may be tricky enough, but it is going to be easy for you because you have come to the right place. If you are looking for the best free stock video sites, the list here is just for you. The list includes all the best sites that you can take advantage of in order to create perfect videos. If you have got tired of finding the right videos for your project, the list of the best free stock video sites is really worth looking at. Now is the time to have a look at the best free stock video sites in 2020.

Pexels

Pexels is one of the best free video sites. It has a number of royalty-free videos that you can use in order to create videos for your YouTube channel or educational purpose. If you have been searching for free videos but have not yet found a good site, Pexels is the one that will surely measure up to your expectations. Pexels offers not just videos but photos too. Videos are available in mp4 format and can be imported into any video editing software in an easy way. Pexels offers videos for both personal use and commercial use. It offers all the videos in high-definition quality. Pexels has been a great free stock video site and is visited by thousands of users every day. If you are looking for a site that offers royalty-free video clips, you should go for Pexels. The great thing about Pexels is, it is completely free.

Stock Footages for Free

It is another effective stock video site that will appeal to you. Stock Footage for Free is one of the most popular sites among a large number of video creators. If you are making a video for a business meeting or educational purpose, you will find it good. The videos found on the site are mostly based on business or education. If you ever think of making an educational video, you should look no further than this. Similar to Pexels, it offers high-quality videos. It offers videos on a wide range of subjects. It includes video clips of famous cities, countries, or monuments. You can not get so much for free. Believe it or not, Stock Footage for Free is absolutely amazing. The videos on the site are absolutely free for commercial use.

Pixabay

One of the best and most popular free stock video sites is Pixabay. Pixabay has an immense library of several thousands of videos. All the videos on Pixabay are in high definition quality. You can use all these videos in your project for commercial use without paying any penny. For those who have just started their journey in the world of video production and are looking for royalty-free videos, Pixabay is a good option for them. Whether your videos are based on fiction or reality, the free stock site will offer you almost every kind of video that will suit your choice. It is not just limited to videos. In addition to it, you can download photos too. All video clips on Pixabay are totally free and can be used in projects commercially or personally. If you are looking for a good free stock video site, Pixabay is really worth looking at. No other sites offer so much as Pixabay does. Giving it a try will surely make you fall in love with it.

Videezy

Videezy is a popular stock video site that offers videos on a good number of subjects. This free video site is appreciated for its huge library of high definition clips. Whether you are making a video for promotion or any other purpose, Videezy may be a nice option for you. The thing that many don’t like about it is, attribution is required when you use the video clips taken from Videezy. Videezy offers videos for free, but there are some videos that you can’t download and use without paying for them. If you don’t want to pay, just stick to free video clips. The site won’t ask you any bucks for free videos. The downside is, you can’t download “Pro” videos without shelling out bucks. All the videos on Videezy are royalty-free and available in high-definition quality. If you are looking for an awesome free stock video site, Videezy is the one you will fall in love with.

Lumen5

People often get disappointed when they don’t get the right video for their project. If you have become tired of searching for the best free stock video site and thinking of paying for videos, stop and think! Why spend money if you can get all the paid videos for free. Lumen5 is one of the most amazing sites. It offers almost all paid videos for free and lets you create awesome videos that can attract audiences easily. The site doesn’t work properly on smartphones. It works well on the desktop.

Scores of YouTubers are nowadays taking advantage of this amazing site. In order to download the videos for free, all you need to do is just create an account and get started. Lumen5 is really a fab stock video site, it is free but, if you want, you can upgrade to the premium plan. It is really good beyond words.

All the sites mentioned above are really excellent and will help you find the right videos for your project.

EdwardLewis is a creative person who has been writing blogs and articles about cybersecurity. He writes about the latest updates regarding mcafee.com/activate and how it can improve the work experience of users. His articles have been published in many popular e-magazines, blogs, and websites.

Source : Stock Video

Here’s How You Can Install, Remove, and Manage Fonts on Your Windows 10 Computer

Do you use the Windows 10 operating system on your computer? Want to install and use some additional fonts on your computer? However, Windows 10 provides you with over 100 pre-installed fonts that you can use with much ease to customize any documents. But it’s okay if you want some more options. Windows 10 makes it much easier to manage the pre-installed fonts on your computer. But if you’re going to install some additional font styles, then this follows a bit different procedure. Windows 10 is one of the most popular operating systems that provide several useful features to its users. And if you want to download and use some more font styles on your computer running Windows 10 OS, then there is a way to do so. Anyone can easily install or remove any fonts on their Windows 10 computer. 

Do you want to know how to do that? Want some tips that you can use to install additional fonts on your Windows 10 computer system? If that is the case, then now, no need to look anywhere as you are in the right place. Here, in our following article, we are going to provide you with the methods going through which you can be able to install, erase, and manage font styles on your Windows 10 computer. So, to get the techniques, please go on and read the complete article.

The Methods to Install, Erase, and Manage the Font Styles in Windows 10

Font styles are significant to make your documents more attractive and worth looking for. And if you use Windows 10 on your computer, then you can add and manage any font styles right from the “Settings” app as well. However, there are various ways to install, erase, or modify the font styles in Windows 10, and this article will let you know some of the methods to do that. It is possible that some of the Windows 10 users might not know the procedure to install and manage fonts on their computers, and for them, we have mentioned the methods step by step. The methods are simple and include some easy steps that any user can follow without any difficulty. You can even download some third-party apps to use new font styles on your Windows 10 computer or visit the Microsoft store to explore more options.

And now, let’s see the methods that you need to apply to install, erase,  and manage the font styles on your Windows 10 computer.

The Steps to Install Any New Fonts on Windows 10 Using the Settings App

Follow the below-mentioned steps to install any new font styles on Windows 10 using the “Settings” app.

  • To get started with this method, firstly, you need to open the “Settings” app of your computer system. To do this, go to the “Start” menu and search for the “Settings”. And when found, click on it to open.
  • And now, go through the “Personalisation” option and then click on the option of “Fonts” given in the left-side menu.
  • After this, a list of the installed fonts will appear on your screen from which you can choose any of the options. Or you can also use the search box to look for any particular font.
  • Next up, click on the link stating “Get More Fonts in Microsoft Store” to install the new fonts. And now you will be redirected to the Microsoft Store page.
  • Here, you will find many options for the fonts, including both the paid and free types. Choose any of the Font and click on the “Get” button to install that Font. 

If you want to remove any particular font from the list, simply select the Font and click on the “Uninstall” button.

The Steps to Manage Fonts in Windows 10

Here are the steps that you need to follow to manage the fonts on your Windows 10 computer. Have a look:

  • To manage the fonts in Windows 10, you need to open the “Control Panel” and then click on the option of the “Appearance and Personalisation”.
  • And now, click on the “Fonts” option. Here, you can be able to view all the fonts that you have installed and can add any new ones into the font Window.
  • To hide or remove any fonts that you don’t want, click on the font style and then click on the “Delete” option from the menu.

So, this is how you can install, delete and manage the fonts on your Windows 10 computer. These are the most straightforward steps that anyone can follow. Try these steps now, and let us know if there are any issues. And to have more details like this, check out our website. 

Edward Lewis  is a Microsoft Office expert and has been working in the technical industry since 2002. As a technical expert, Edward has written technical blogs, manuals, white papers, and reviews for many websites such as office.com/setup.

Source : Manage Fonts on Your Windows 10 Computer

Detailed Guide on Optional Features of Windows 10

Windows 10 is continually updating their ever-evolving operating system. Users get the benefit of an updated security system and additional features that they may not know. A lot of features were considerably made for IT administrations and to give more power to users. The Windows 10 operating system comes with various optional features that can be turned on or off by the users as per their requirements. Most of these features have a goal or purpose that serves your needs on your computer. These features are available in both the new Settings and Control Panel area. You can choose either of these two to use the features. Here is how you can enable the optional features.

Settings area

1. Begin with pressing the Windows + I key to open Settings.

2. Go to apps and click on optional features.

This will show you a list of all the installed features. To check the list properly, you can sort them on the basis of name, size, and installation date. If you find any feature taking a lot of space or don’t find the need for that feature, you can delete it by following these steps:

• Click on that feature to select it from the list.

• Click on Uninstall.

If you have ever deleted any features or want to check the history of the list, click on ‘See Optional Feature History’ that records all the data for installing and uninstalling that feature.

If you choose to add an optional feature to your desktop, click on Add a Feature option. A new window will pop up on your screen, from where you can click on the checkmark on the boxes of the features that you want to install on your desktop. To know briefly about the feature, click on the feature’s name, and it will show you all the details. When satisfied, click on Install.

Control Panel

The easiest method to open optional features follows these steps:

1. Click on the Windows + R key to open the Run window.

2. Enter ‘optionalfeatures’ command.

3. Click on the ‘Ok’ button.

This will open up a new window, where you will have to checkmark the boxes for the features you want to enable on your desktop. In case you find the boxes filled as entirely black, it indicates that only a part of the feature has been enabled on your desktop. If you want to use the rest of the tools or benefits of that feature, click on the ‘plus’ icon to enable or disable some specific elements. If the box is blank, then it will indicate that the feature has been disabled. Once you are satisfied with your changes, click on Ok to save them. Restart your computer to apply all the changes.

Following are some of the features and their explanation that you will find on your PC:

• Containers: It offers tools for creating and managing Windows Server Containers.

• Device Lockdown: It protects your device against drive rights.

• Guarded Host: Configure this feature and run shield virtual machines on a server.

• Hyper-V: It offers services and management tools for running virtual machines.

• Internet Explorer 11: It is Microsoft’s latest web browser.

• Maths Recognizer: It digitizes your maths handwriting via its Math Input Panel.

• .NET Framework 3.5 and .NET Framework 4.8 Advanced Services support the applications using the versions of the NET framework.

• OpenSSH Client: It securely manages all the keys and gives you access to remote machines.

• Print Management Consoles: It manages all your printer needs, including printer driver and printer server.

• XPS Viewer: It reads, copies, prints, signs, and sets permission for all your XPS documents.

This was all you need to know about the optional features of Windows 10. You will find many more features on your desktop than the features mentioned above. Utilizing all these features will help you run your desktop efficiently.

Edward Lewis  is a Microsoft Office expert and has been working in the technical industry since 2002. As a technical expert, Edward has written technical blogs, manuals, white papers, and reviews for many websites such as office.com/setup.

Source : Windows 10

Pokémon Go: August Community Day Leaked

Dataminers recently revealed another community day of Pokémon Go that might feature four different types of Pokémon. Community day takes place every month on a specific date and every Pokémon Go lover waits for this day to arrive. On July 19, Gastly was featured on the community day. Now August is on the way and players are already excited about which Pokémon will get featured.

In May, the Pokémon Go official Twitter handle account posted a poll to let fans choose which two Pokémon should feature in the upcoming community day. In the poll, Gastly and Weedle were the highest chosen Pokémon. Community day of June featured Weedle and July featured Gastly. Dataminers have discovered the choice of fans for the August and September month. Fans can vote for Charmander, Porygon, Caterpie, and Grimer.

Charmander was part of a previous community day, but the other three Pokémon never had a chance to feature. So it’s a great opportunity for the remaining Pokémon to get featured. On community day, the number of spawning increases for the featured Pokémon. Shiny Pokémon also arrives on the same day, and their chances of appearing are also high at the community day.

In the community day, some bonuses like double Exp, reduced egg distances and some special bonuses are offered to the players. Shiny Pokémon are nothing different, but they have a different color than regular Pokémon.

On community day, the chances of a shiny Pokémon appearing are high. Caterpie, Grimer and Charmander have shiny forms in the game, but Porygon doesn’t have one. So this will make much sense in the poll. The chances of Caterpie getting the highest votes are high, but Porygon doesn’t have a shiny form so now players will have a chance for the first time to catch Porygon in the shiny form. Charmander is a favorite Pokémon of every Pokémon fan, so it will also get a great number of votes.

The current month is a big month for Pokémon Go players because they have to vote on what they want in the next month.

Conclusion

Pokémon Go developers and the event team stay in touch with their fans, and this is the most admirable thing about the game. Players put so much effort into catching legendary Pokémon and evolving them. Since evolving your Pokémon requires several candies, use this event as an opportunity to get the most out of them!

Edward Lewis is a creative person who has been writing blogs and articles about cybersecurity. He writes about the latest updates regarding mcafee.com/activate and how it can improve the work experience of users. His articles have been published in many popular e-magazines, blogs, and websites.

Source : Pokémon Go

Design a site like this with WordPress.com
Get started